|
|
Recording a narration for your slideshow Once you are completely happy with the visual part of your slideshow, you may wish to add a narration to the slideshow, or parts of it. PhotoVidShow has a built in audio record feature that allows you to record voice narration. Although you could record one narration for the whole slideshow in one go, it may be preferable to record small sections at a time. PhotoVidShow will allow you to move and edit your narrations afterwards. This is covered in the later sections. To record a narration, make sure you have a microphone plugged into your computer (some laptops may already have a built in microphone), and then set the slideshow preview slide bar to the location from where you wish the narration to begin. This may simply be the beginning of the slideshow. You then left click the 'Record narration from current position' button from the storyboard panel.
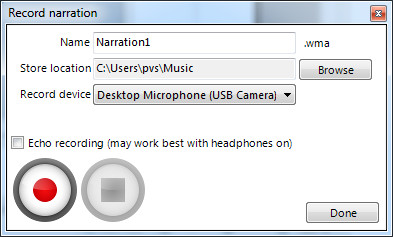
You will then be presented with a 'Record narration window'.
PhotoVidShow will automatically choose a name and a file location for your recorded narration. This can be changed if desired. Currently all recordings are saved as Microsoft .wma file. Also change the input record device option if this is not set correct. I.e. if multiple devices exist. Once the 'Record' button in selected, PhotoVidShow will begin playing the slideshow in the preview panel from the current position. You can now record you narration using your record device whilst watching your slideshow play. If you wish to pause for any reason, left click the 'Pause' button. When you are ready to continue recording, left click the 'Continue recording button'. When you have finished recording your narration, left click the 'Stop' button. PhotoVidShow will then close down the window and return to the main window with your newly created narration inserted into the narration part of the storyboard panel. Note: If the slideshow finishes whilst recording a narration, PhotoVidShow will automatically stop the narration for you. It may be worth recording a small section first to make sure the microphone is working correctly and that the output is not too loud or quite. You can always delete this test recording later on. You can also select the 'Echo recording' option when recording. This simply echo's back your recording. To prevent possible feedback problems, it may be worth using headphone when doing this.
|